Tutorial & Notice
Installing a bike electrification kit can seem daunting at first, but don't panic! Here are a few steps to help you install your bike electrification kit safely and efficiently
7-step video tutorial :
Assembly tutorial summary
- The tools you need
- Parts list
Motor installation
- Step 1: Position the motor
- Step 2: Attach the mounting plate
- Step 3: Attach the clamp
- Step 4: Tighten plate and clamp
- Step 5: Installing the display
- Step 6: Attach the cable to the frame
- Step 7: Install the speed sensor
- Step 8: Install battery and connect cables
- Step 9: Fit cranks, pedals and chain
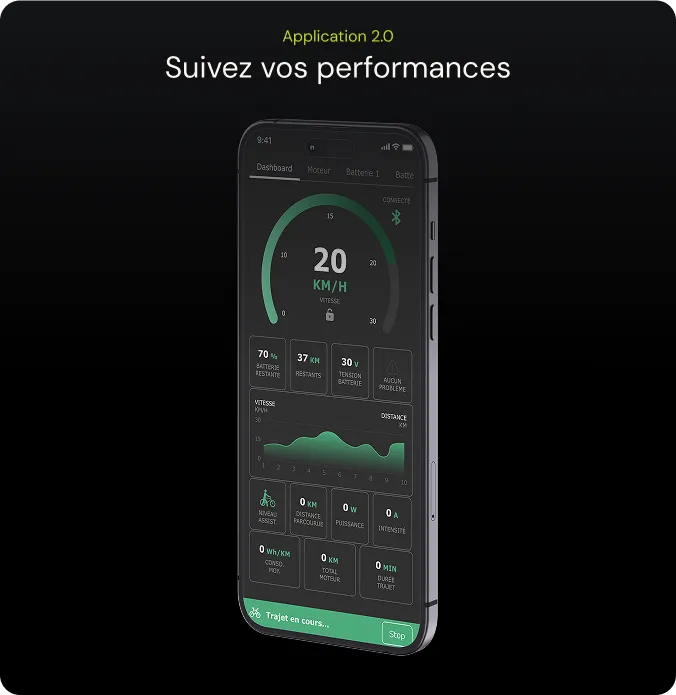
Battery application
Wiring diagram
Motor dimensions (in mm)
Battery dimensions (in mm)
Step-by-step picture tutorial :
The tools you need
To install like a pro, make sure you have the following tools and consumables at your disposal:
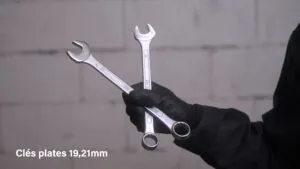
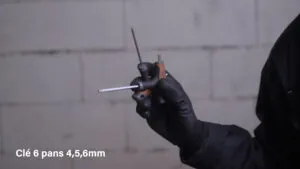
- 6-sided wrenches (4,5,6 mm)
- Flat wrenches (19.21 mm)
- Cassette remover (optional)
- Chain whisk (available as an option)

Parts list
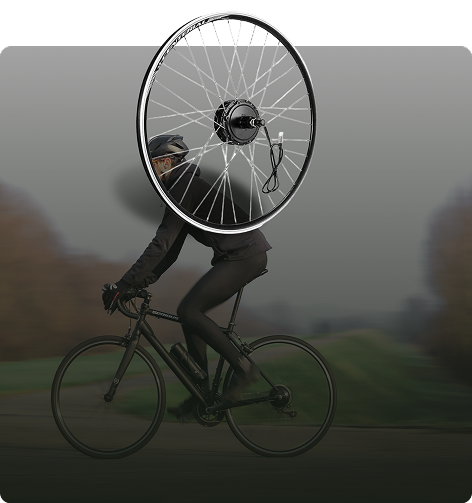
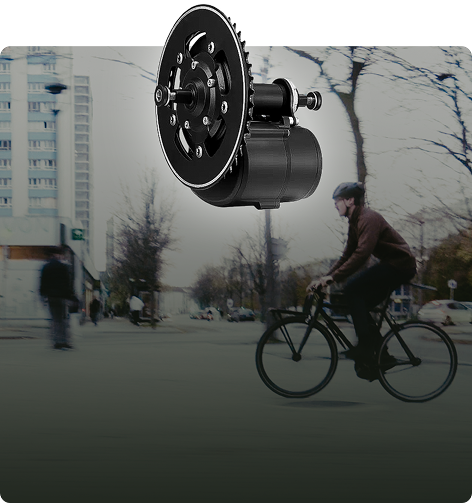
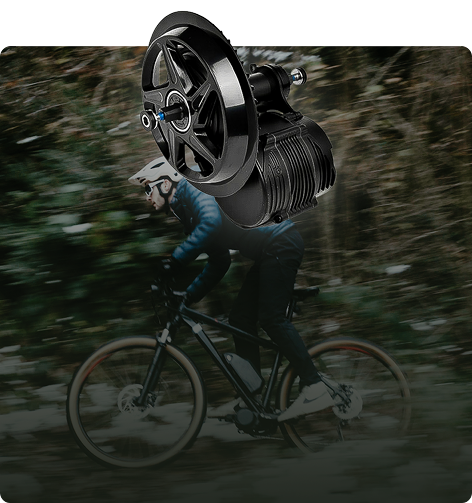
1.Motor Rear Wheel
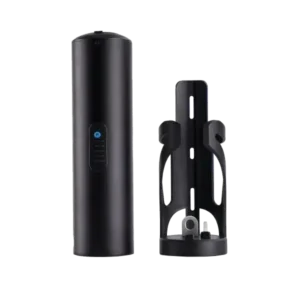
2.Syklo battery
3.battery holder
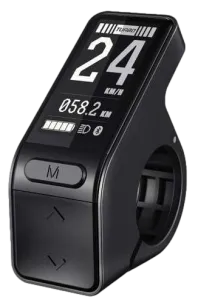
4.SW102 SYKLO display
5.Screen support (optional)
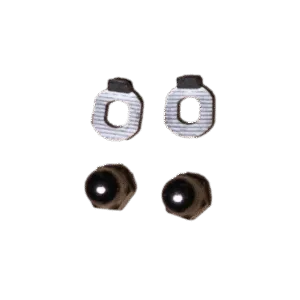
6.M12 nut
7.M12 washers
8.installation manual

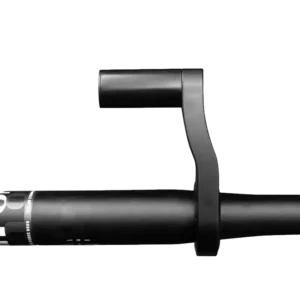
Rear wheel motor installation
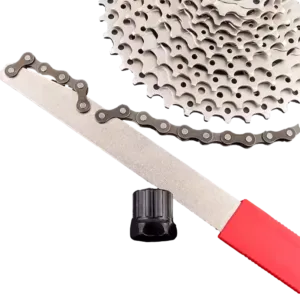
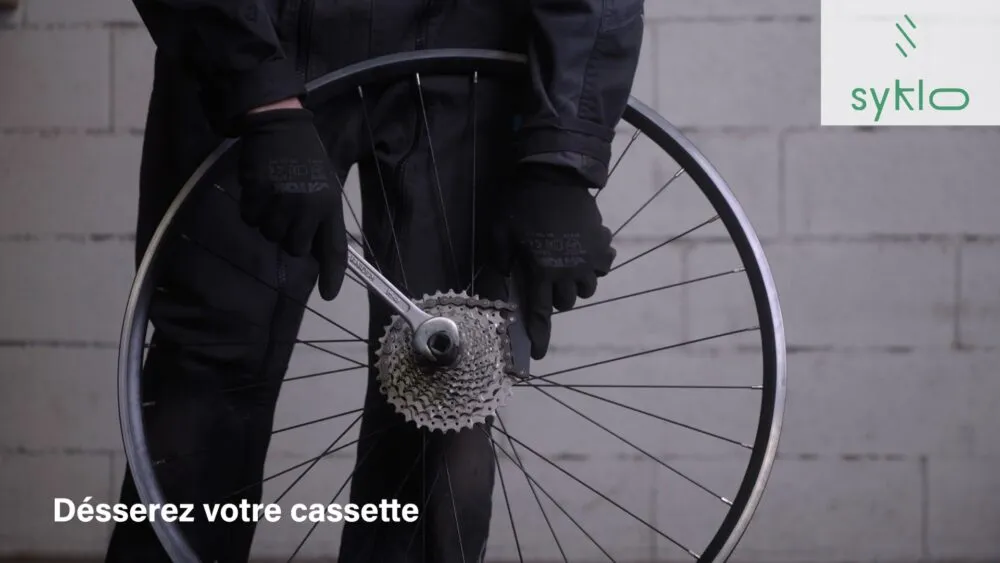
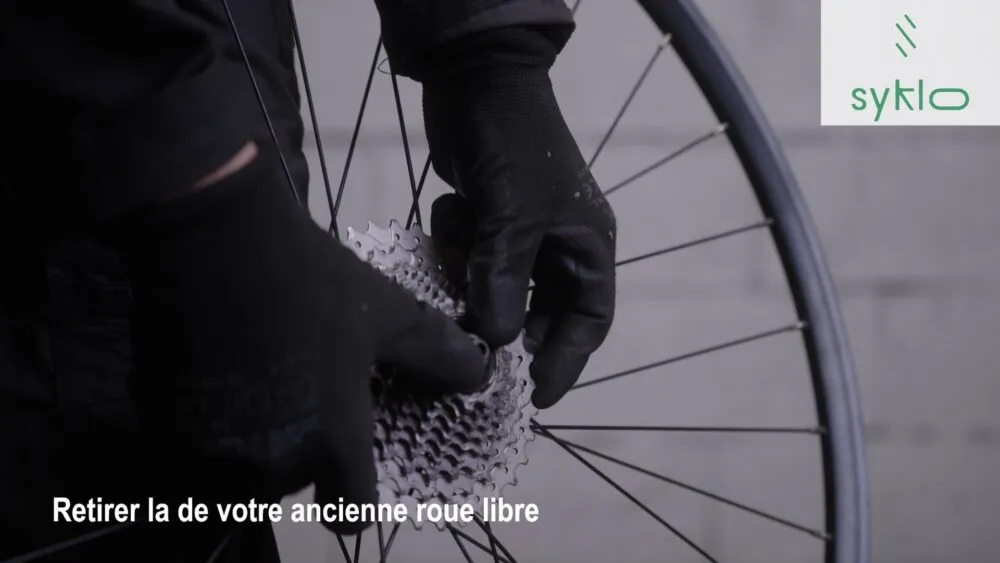
Step 1: Fitting the cassette to the freewheel
Loosen your cassette and remove it from your old freewheel.
Remove it from your old freewheel.
Mount the cassette on the freewheel of the rear-wheel motor.
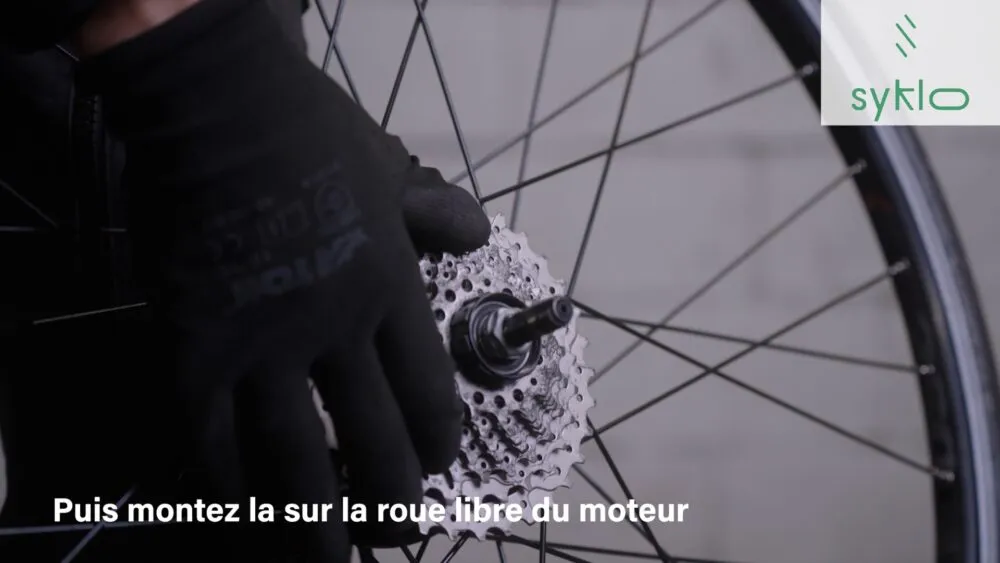
Then tighten the cassette (torque 40 N.m).

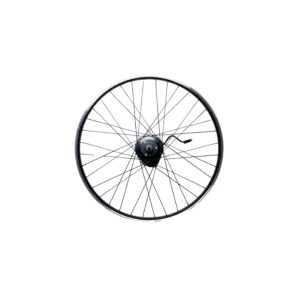
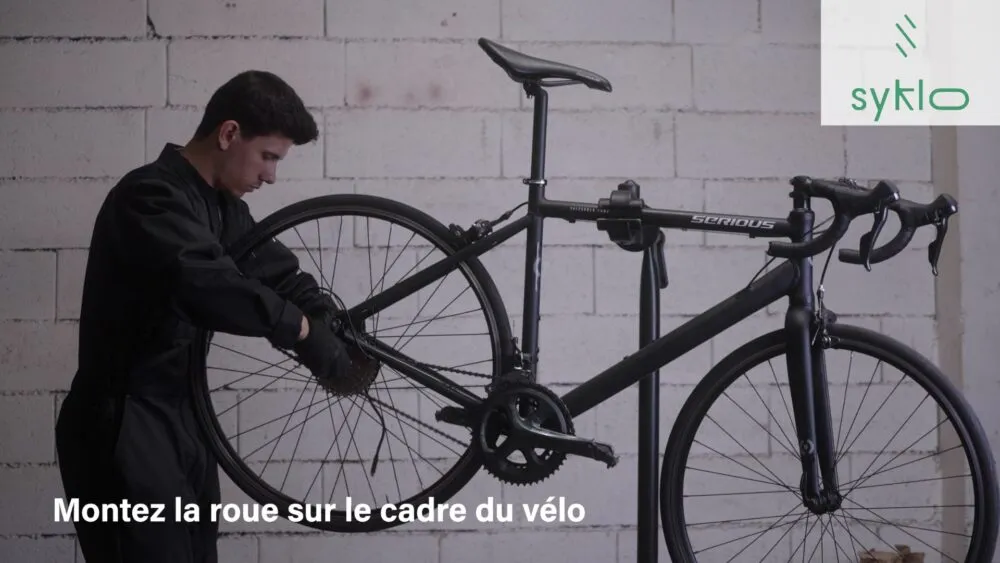
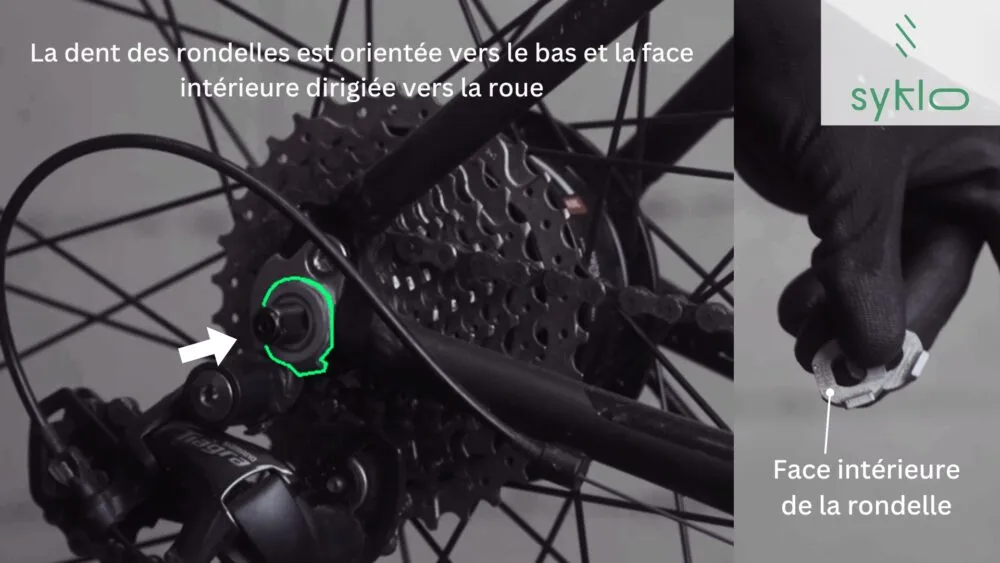
Step 2: Wheel assembly
Mount the motor freewheel on the bicycle frame.
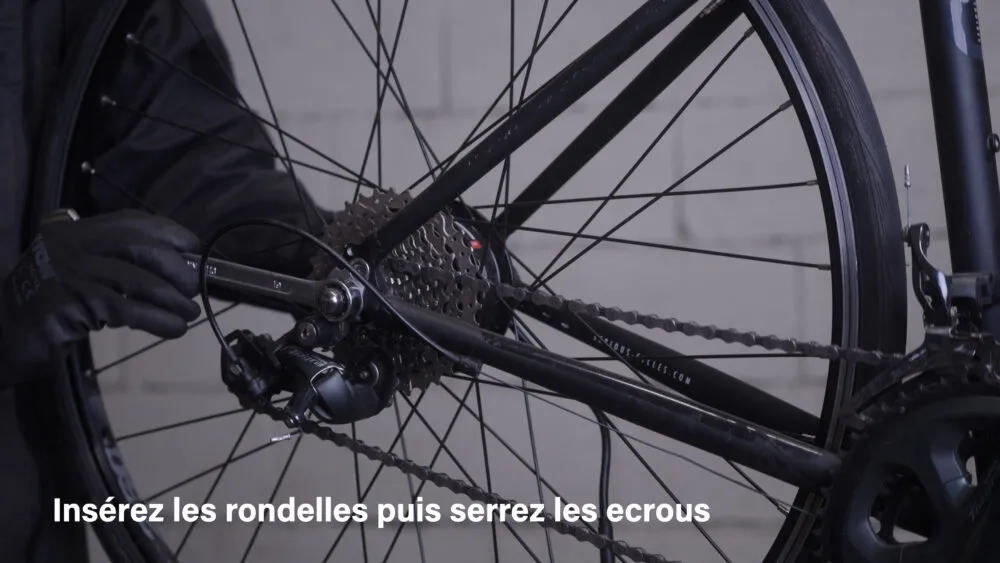
Important information:
Align the washers correctly, with the tooth of the washer at the bottom and the inside of the washer facing the wheel.
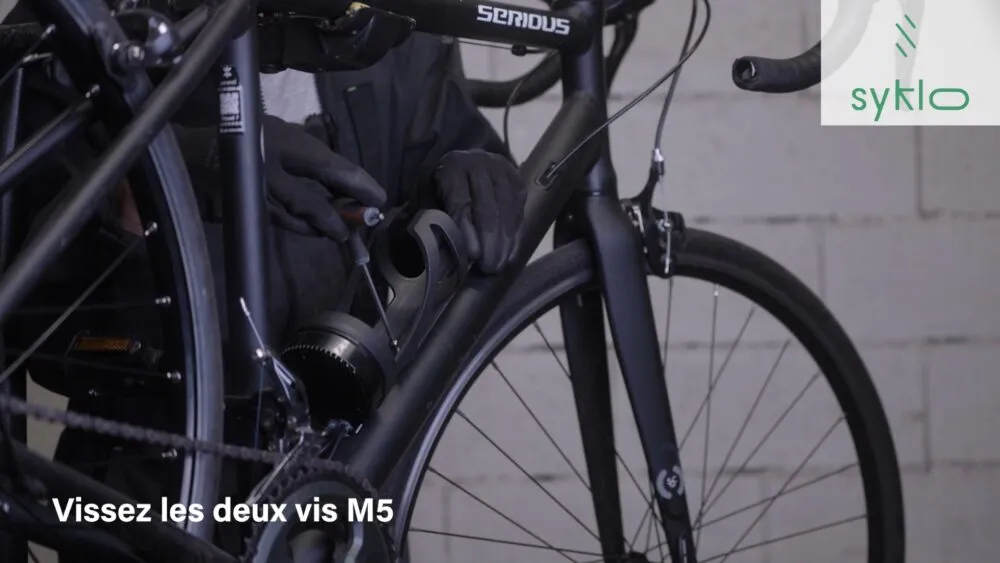
Step 3: Attach the battery holder
Secure the battery holder to the bicycle frame using the two M5 screws.
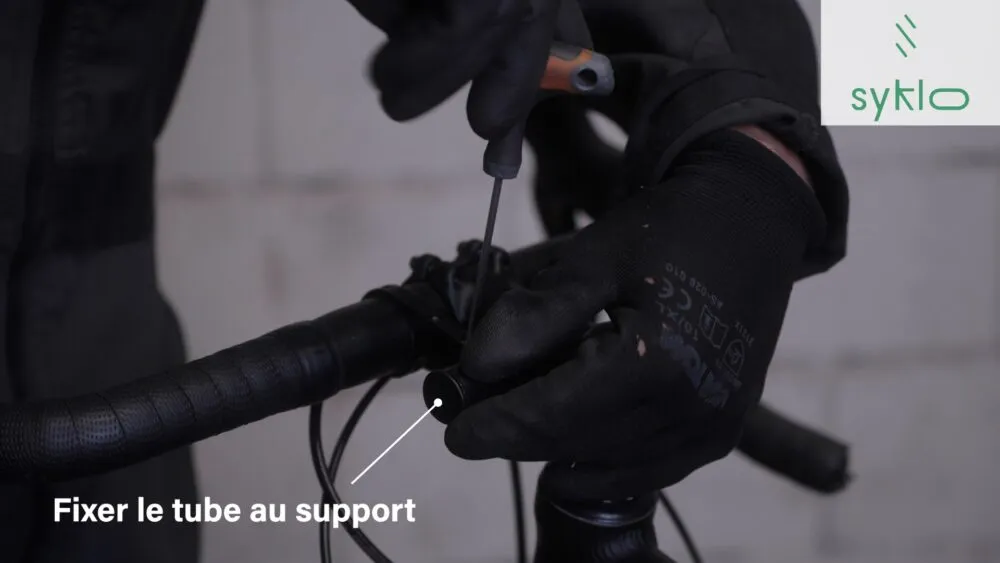
Step 4: Attach screen support (optional)
Attach the screen mount to the handlebars, adding the rubber adapters if necessary.
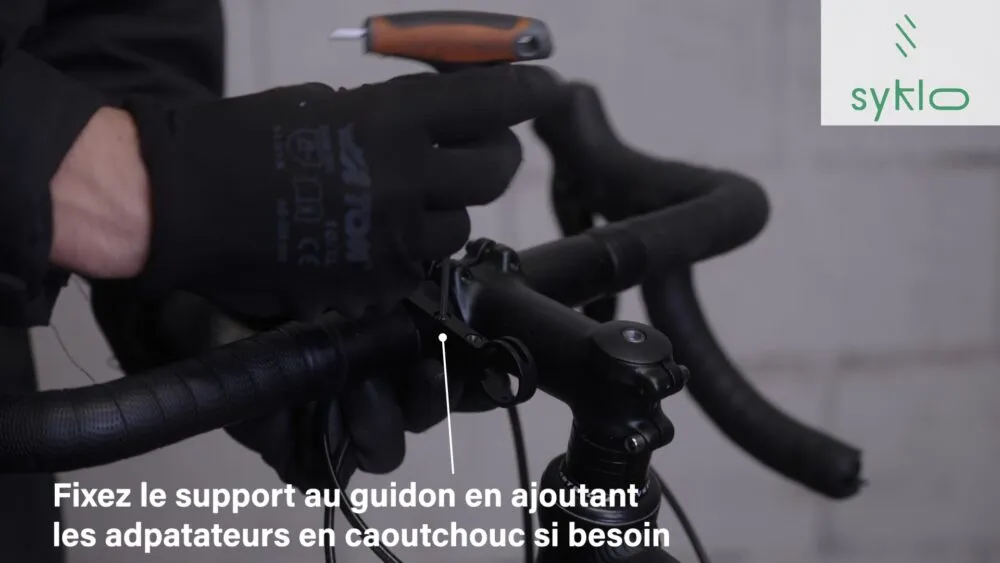
Attach the tube to the bracket.
Attention : the handlebar extension for road handlebars is optional. Click here to obtain it.
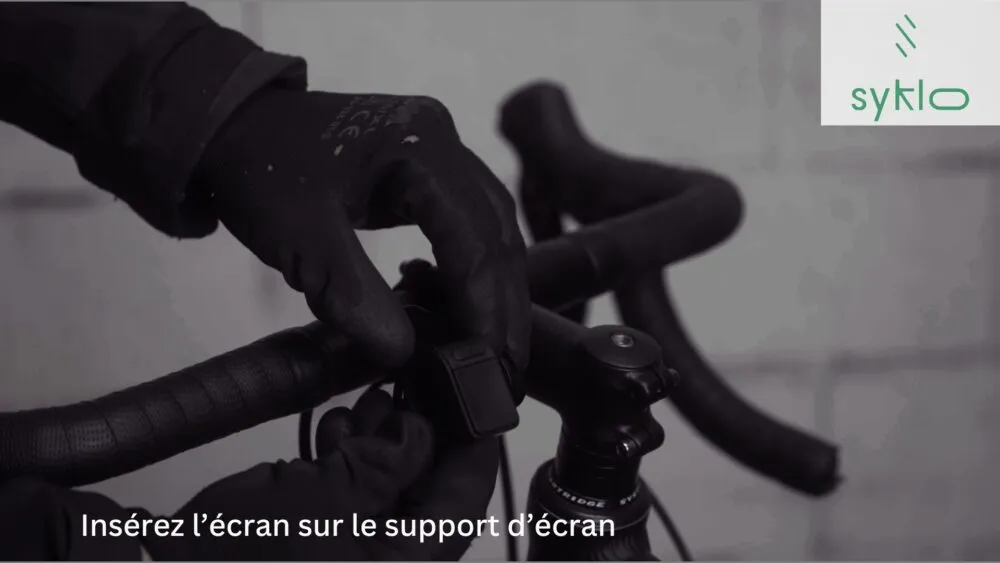
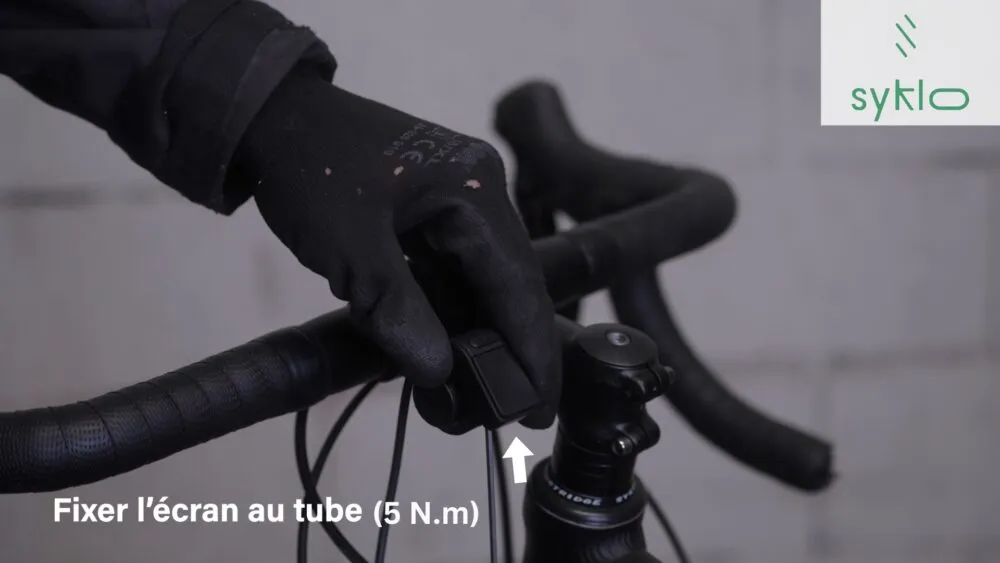
Step 5: Attach SW102 screen
Insert the display onto the display holder.
Fix the screen to the tube, tightening loosely (torque 5 N.m).
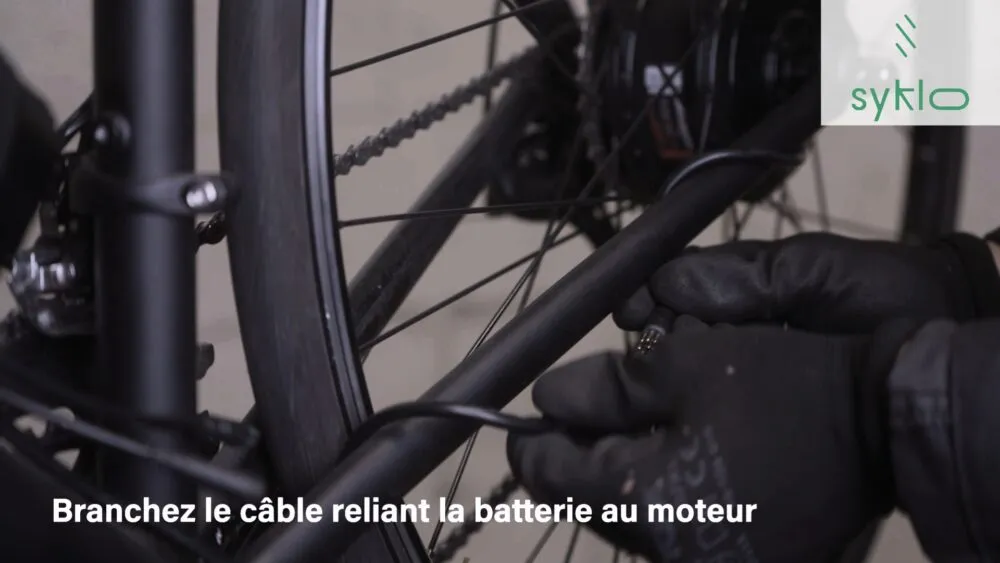
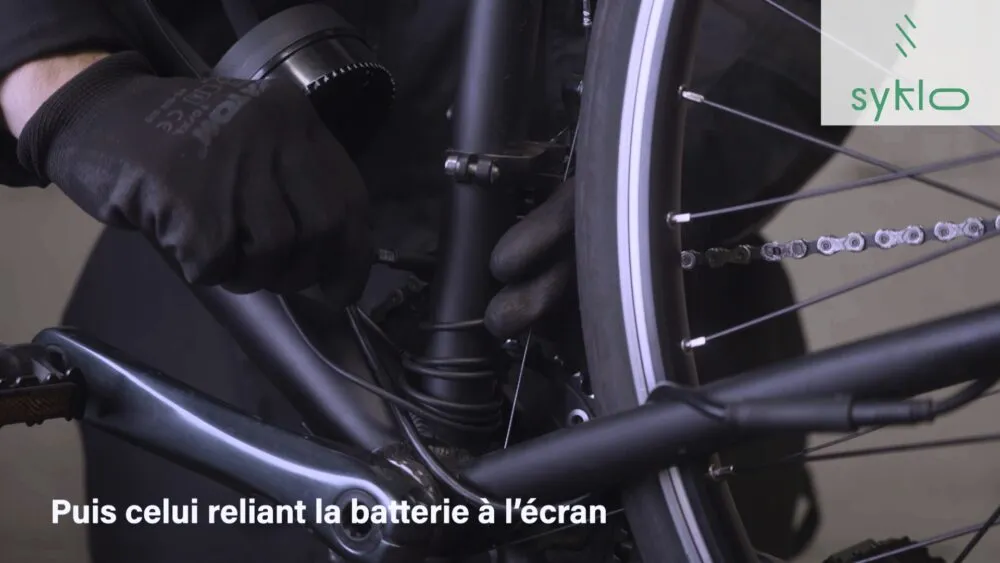
Step 6: Connect and secure cables
Install the Syklo battery on the battery holder.

Connect the cable linking the Syklo battery to the wheel motor.
Connect the cable linking the Syklo battery to the SW102 display.
Battery application
Give new life to your favorite bike
Visit us and electrify your bike today!
Discover the kitMake an appointment
Our electrical kits
RoadDrive 45 – Electric Bike Kit
Electric bike kit ideal for a lightweight urban electric bike
from
790 €
4.5/5
UrbanExplorer Z2 – Electric Bike Kit
Give your bike a second life by transforming it into
from
600 € – 1010 €
4.5/5
PowerTrail Z8 – Electric Bike Kit
Discover the unique power of the TSDZ8 motor with its
from
660 € – 1150 €
4.5/5
Any questions before you saddle up?
What is an electric bike kit?
An electric bike kit is a set of parts that transforms a conventional bike into an electric one. It generally consists of a motor, battery, controller and control screen. The motor can be mounted on the hub of the front or rear wheel, but ideally it will be mounted directly on the crankset (perfect combo: efficiency / maneuverability) and powered by the battery.
The controller is the brain of the system, managing the motor’s power supply and ensuring that everything runs smoothly. At Syklo, we program it using our Open Source Software (OSF).
Last but not least, the control screen lets you view various parameters such as speed, distance covered, remaining battery life, current/average/maximum fuel consumption and lots of other useful information thanks to the OSF.
If you’re looking to convert your bike into a practical and economical means of electric transport, an electric bike kit is an excellent option.Please contact us if you have any questions about installing or configuring the best kit for your bike.
Does your bottom bracket motor kit fit all types of bikes?
Our TSDZ2 crankset motor kit fits most types of bikes, including city bikes, mountain bikes, cargo bikes, racing bikes and more. With its easy-to-install design and numerous mounting options, our kit can be installed on most bicycle frames without major modification. This means you can easily transform your current bike into a practical means of electric transport, while retaining the comfort and manoeuvrability you appreciate. Here’s the page where you’ll find all the information you need to make sure your bike is compatible.
If you have any questions about the installation or compatibility of our TSDZ2 conversion kit, please do not hesitate to contact our team for expert advice on how to adapt our kit to your bike.
What are the advantages of your electric conversion kit?
Our TSDZ2 electric bike conversion kit offers many advantages for cyclists who want to transform their everyday bike into a practical, environmentally-friendly means of electric transport. With a powerful motor, top-of-the-range battery and Open Source software, this kit offers precise, smooth electric assistance for an enjoyable, effortless cycling experience (or almost, it’s up to you 🙂 ).
Our TSDZ2 kit stands out for its reliability, durability and ease of installation. The motor is designed to provide reliable, constant electric assistance, whether you’re pedaling on flat terrain or more challenging hills. Our batteries are also high-performance, providing a range of up to 100 km.
Our electric conversion kit also offers reduced energy consumption (thanks to the torque sensor and Open Source software). By opting for an electric bike instead of your car, you’re helping to reduce greenhouse gas emissions while saving money on your daily commute.
All in all, the electric bike conversion kit with TSDZ2 motor is a wise choice for cyclists looking to transform their bike into a practical, ecological and economical means of electric transport. So don’t hesitate to contact us if you have any questions about installation, or to choose the best kit for your needs.
How long do your batteries last?
If you use a 360 Wh battery for your electric bike fitted with a TSDZ2 250W motor, range will depend on various factors. However, you can expect a battery life of between 40 and 70 km, depending on the frequency of assistance, the rider’s weight, weather conditions (wind, cold) and the terrain covered.
The lower battery capacity will also influence the overall weight of the electric bike. By choosing a higher-capacity battery, such as a 540 Wh, you can ensure a longer range (around 100km). However, it’s important to note that larger-capacity batteries will similarly increase the overall weight of your electric bike.
In all cases, our team can help you choose the battery that best suits your needs and your bike. Contact us for more information on our batteries and kits with TSDZ2 motors.
How to install your bike electrification kit?
Installing a bike electrification kit can seem daunting at first, but don’t panic! Here are a few steps to help you install your bike electrification kit safely and efficiently:
- Preparation: Before you start, make sure you have all the tools you need for installation. And check your bike’s compatibility: Explanation here
- Remove existing parts: To install the kit, the existing cranks and crankset must be removed. Tuto here and here
- Fitting kit parts: Install the parts supplied with the kit, such as the motor, battery and display. Tuto here
We hope these instructions have helped you install your bicycle electrification kit safely and with peace of mind. If you encounter any installation problems or have any questions about the kit, please don’t hesitate to contact us. We’re always ready to help!
Is your kit Made in France?
Short answer: No.
Long answer: We’ve chosen to concentrate on the design, customization, programming and after-sales/repair of our kits here in France. But let’s face it, what really counts is where the components and raw materials come from. For the moment, we don’t plan to assemble the engine components ourselves, but we’re thinking about it, as the time required is low (around ten minutes) and it would improve our quality control, but we wouldn’t be so quick to talk about Made in France.
Is it legal to electrify a bike in France and Europe?
Yes, electrifying a bike is legal in France and Europe, but there are a few rules to observe. First of all, motor power must be limited to 250 watts, and the maximum speed must not exceed 25 km/h. What’s more, the bike must be equipped with a system that automatically cuts off electric assistance when the cyclist exceeds 25 km/h or stops pedaling. Wearing a helmet is not compulsory, but we strongly recommend it for the cyclist’s safety, as well as the installation of a powerful light and the wearing of a fluorescent vest (top of the class).
Our bike electrification kit meets all legal requirements in terms of motor power, maximum speed and automatic cut-off of electric assistance (the torque sensor automatically detects whether you are pedaling or not). So you can electrify your bike legally and without the risk of a fine.
However, it’s important to note that if you modify the kit to exceed the legal power or speed limits, you risk a fine and your bike will no longer be allowed on public roads. For your own safety and that of other road users, we recommend that you comply with the power and speed limits recommended by law. What’s more, if you modify these parameters (max speed and max power), the 24-month warranty no longer applies.
Our bike electrification kit is designed for moderate use. Any modification of maximum speed, power or intensive use at maximum power risks accelerating the normal wear and tear of motor parts.
What is the electrification kit warranty?
Our bicycle electrification kit is guaranteed for 24 months from the date of purchase. However, it only applies within the limits of use in compliance with the legal rules on power and speed. If you alter these parameters or use the kit intensively at maximum power, this accelerates the normal wear and tear of motor parts, and the warranty will no longer be valid. It is therefore essential to respect the legal limits and use the kit under the right conditions.
We also recommend that you do not allow the battery to discharge completely. Finally, use of the electrification kit in extreme conditions (mountains, sand, snow) may cause premature wear of parts and will not be covered by the warranty. It is therefore important to follow the recommended instructions for use to prolong the life of the kit and avoid any problems. If you have any questions about how to use the kit, please do not hesitate to contact our customer service department for advice and recommendations.
To sum up, here are the points to keep your warranty in force for 24 months, or even better, to exceed 5,000 km in 2 years without major maintenance👍:
- Use in compliance with legal power and speed requirements
- Use of the kit in the right conditions (no intensive off-road use, no loads exceeding 150 kg)
- Store under cover to avoid exposure to moisture.
- No immersion in water or near fire
- Operating temperature from -10°C to 40°C
- Battery storage ideally between 15°C and 25°C
- Monthly 10-15 minute battery charge when not in use
- Do not allow battery to discharge completely (can be programmed via OSF)
- Avoid use in extreme conditions (mountains, heavy rain, sand, snow).
In the event of a problem covered by the warranty, our after-sales service is at your disposal to find a quick and efficient solution (always giving priority to repair rather than replacement).
We’re convinced of the quality of our electrification kit, and we do everything in our power to guarantee the best experience for our customers.
Assembly tutorial summary
- The tools you need
- Parts list
Motor installation
- Step 1: Position the motor
- Step 2: Attach the mounting plate
- Step 3: Attach the clamp
- Step 4: Tighten plate and clamp
- Step 5: Installing the display
- Step 6: Attach the cable to the frame
- Step 7: Install the speed sensor
- Step 8: Install battery and connect cables
- Step 9: Fit cranks, pedals and chain


